Easy Quick Ridges Crochet Hats Free Pattern
Are You Looking for a Quick & Easy Crochet Hat Pattern?
Easy Quick Ridges Crochet Hats Free Pattern:
Well, look no further! You will be amazed at the simplicity in making these Easy Quick Ridges Crochet Hats.
This hat is basically a rectangle that you ‘seam’ together and gather at the top. Not much easier than that, right?

Simple easy stiches; only basic chain stitch, double crochets (dc) and back loop only (blo) are needed for this pattern.
Since this is a simple rectangle created hat, You can easily modify the pattern with any of your favorite stitches. Simply take note of the repeat pattern for your stitch and base your foundation (beginning chain stitch row) on that repeat pattern.
A couple of examples of stitches easily used are ‘seed stich pattern’ and the ‘moss stitch pattern’. Experiment and play with your favorite stitch. Let me know what stitches have (or have not) worked for you with this pattern!
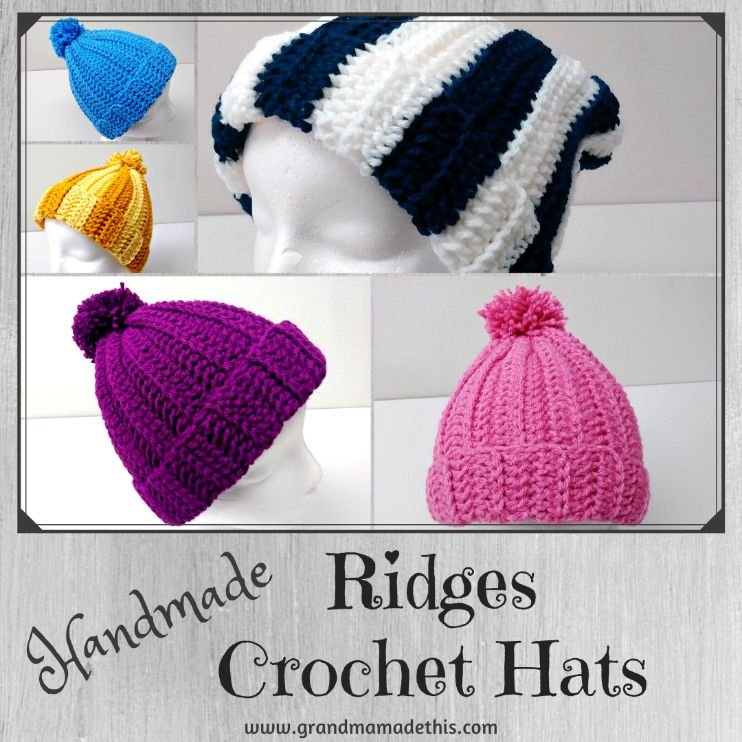
Below are the 5 hats I made with the Easy Quick Ridges Crochet Hats Free Pattern:

Ridges Blue Crochet Hat

Ridges Golden Yellow Crochet Hat

Ridges Grape Crochet Hat

Ridges Navy White Crochet Hat

Ridges Pink Crochet Hat
I have one of each hat available for sale @ $16.25 ea!
Sorry, this is SOLD OUT!
While you are here, check out some other Crochet Hats I have on my website!
… And now, Your Free Pattern!
Easy Quick Ridges Crochet Hats Free Pattern
Size I crochet hook – however you may use any size hook as per your yarn, you will simple make your rectangle larger – for instance, more rows with a longer starting chain. I have also made these hats using H & J hooks and each turned out great!
Yarn of your choice – in my examples I used Caron One Pound yarns as well as used Red Heart Super Saver yarns, so basically any yarn will work in this pattern.
Pattern:
You will be working in rows for this pattern. At the end of each row, you will turn your work to complete the next row. By working in the back loop only (blo) of every row, you will be creating the ‘ridges’ that make this hat an awsesome, easy quick crochet hat.
Note: These instructions are for what I call a ‘standard’ size hat, one in which fits me. However, everyone’s ‘standard’ is different! You will need to adjust you starting chain to the size you prefer. For example: what I did was create a beginning chain and then put that chain around my head from the base (back of neck) to the top (forehead). When I was comfortable with the length of my chain, that is what I wnet with, which in my case was a chain of 30. We will add 4 stitches to our base chain, which will count as the first dc.
Starting (beg.) chain of 34 (30+4)
Rd 1: Dc in fourth chain from you hook. Dc in each chain to end of row; turn work.
Rd 2: Ch 2, dc in the blo (back loop only) of each dc to end of row; turn.
Rds 3-30: Repeat Rd 2 ~ Note: You may need more (or less) rounds! I did a total of 30 rows, however you may need more or less for you desired size. Before finishing, hold the rectangle around your head to see if that size is what you need. Don’t forget that you will be folding part of this for the ‘rim’, so allow an extra few inches, depending on how much ‘rim’ you desire. You may also create a longer rectangle so that you could fold your rim twice for a snugger fit, if desired. Also, keep in mind your hat will stretch some, as do ALL crochet projects, so you may wish for this ‘test’ to be a little snug, that will be up to you.
Side Seams:
Side Seams:
When you have reached the size/rows for you desired hat you may fasten off (f.o) ~ make sure you fasten off leaving about a 22 -24 tail of yarn. You will use this ‘tail’ to sew the rectangle edges together as well as gathering the top together.
You will fold together your rectangle (chain row with your final row). Match the ‘chain’ stitches [side a] with the dc stitches in final row [side b]. Using a tapestry needle (plastic canvas needle) weave the tail in an out of both ‘sides’ (going thru the tops of the dc’s & chains) of the hat to join. Tie a knot at the top, being careful to not pull to tightly to cause the seam to ‘pucker’. Don’t cut your yarn yet, we’ll use it to close up the top!
Finishing the top:
Finishing the top:
Gather the top of the hat into a ‘circle’. Weave your yarn (that’s still on your needle) in and out of each row (like a whip stitch). Pull this circle tight, using the threaded yarn to sew the ends closed. Tie off, fasten off, then weave in all ends.
Add a Pom Pom as desired. I find these look best with an attached pom pom, but of course that will be up to you. The Navy White hat I made looks like a ‘slouch’ hat so that it would ‘droop’ down.
There are about a million and one tutorials for making pom poms out there,


